Service Manager
Setting Up Change Management
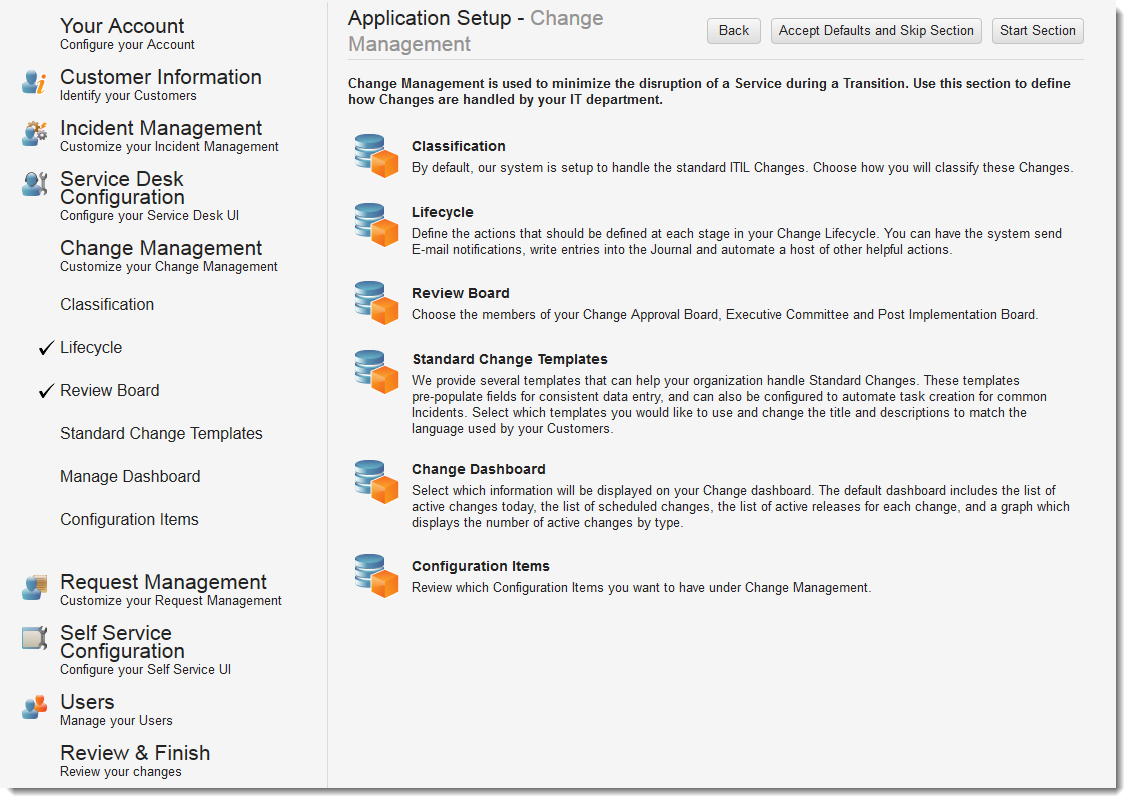
Use the Application Setup - Change Management page to customize how the Service Desk handles changes.
Application Setup - Change Management Page
This is one step of the application setup process. For more information about this process, including how to access this page, see Setting Up the Application.
See the following sections:
•Defining the Types of Changes for Your Organization
•Defining the Steps for the Change Lifecycle
•Creating a Change Approval Board
•Defining the Standard Change Templates
•Configuring the Change Dashboard
•Defining the Configuration Items for Change Management
Defining the Types of Changes for Your Organization
1.Click Classification. The application displays the Application Setup - Classification page.
2.Define the types of changes within your organization. The default types are:
| Type | Description | Role |
|---|---|---|
| Standard | A preapproved change that is low risk and follows a standard procedure. Use change request templates to automate your standard changes. |
Administrator |
| Minor | A change with minor impact that requires few resources and minimal review. |
Administrator |
| Significant |
A change with significant impact that requires significant resources and peer review. |
Administrator |
| Major | A change with major impact that requires many resources, extensive planning, and special approval. |
Administrator |
| Emergency | An emergency change that must be introduced immediately and that requires special processing. |
Administrator Change Manager Service Desk Analyst Service Desk Manager |
3.To rename a change type, do the following:
| a. | Click Rename. |
| b. | Enter a new name and optionally a new description. |
| c. | Click Save. |
4.To add a new change type, do the following:
| a. | Click Add Change Type. |
| b. | Enter a name for the new change type and a description. |
| c. | Click Save. |
5.To enable a change type, check the box preceding its name.
6.To disable a change type, uncheck the box. (You cannot delete change types, but you can disable them.)
This Change Type is Enabled

7.Click Next to go to the next page.
Defining the Steps for the Change Lifecycle
On the Application Setup - Change Lifecycle page, you select the actions to take at each stage of your change management lifecycle. If you have advanced lifecycle requirements, you can define them later.
The default change lifecycle settings are:
•Create change request (logged)
•Cancel change
•Request change
•Send change for approval
•Deny or cancel change
•Pending approval
•Defer or cancel change
•Approve change
•Deny approval
•Scheduled
•Cancel change
•Implemented
•Closed
Follow these steps:
1.Click Lifecycle. The application displays the Application Setup - Change Lifecycle page.
2.For each change lifecycle stage, check the quick actions to occur.
3.To automatically send an email when the application updates the change to the associated status, do the following:
| a. | Check Send Email. |
| b. | Use the associated drop-down list to select a notification type, such as SendRequestorNotificationChangeScheduled. |
| c. | Click Preview Email to preview the message. |
4.To add another quick action to this lifecycle stage, do the following:
| a. | Click Add another action. |
| b. | Select a quick action type. You can select from the following quick actions: Baseline, Composite, Insert Child Object, Run For Child, Send Email, and Update Object. |
| c. | Select a quick action. The application lists the quick actions that are associated with the selected quick action type. |
| d. | Click Save. |
5.Click Next to go to the next page.
Creating a Change Approval Board
Identify users to participate in your Change Approval Boards (CABs). Review the default CABs to determine their membership.
| Groups | Description |
|---|---|
| Change Approval Board | CAB group for non-emergency changes. |
| Emergency Change Approval Board | CAB group for emergency changes. |
| Management Committee | Management committee for major changes. |
1.Click Review Board. The application displays the Application Setup - Review Board page.
2.To edit the review board details, do the following:
| a. | Highlight one of the review boards. |
| b. | Click Rename. |
| c. | Change the group name, group details, or change type. |
| d. | Click Save. |
3.To add a new member to a group, do the following:
| a. | Highlight one of the review boards. |
| b. | Click Add Member. |
| c. | Choose a search category, enter the search criteria, and click Go. |
| d. | Highlight a name. |
| e. | Click Link. |
4.To remove a member from a group, do the following:
| a. | Highlight one of the review boards. |
| b. | Click Unlink next to a member's name. |
5.To add another group to the list, do the following:
| a. | Click Add Group. |
| b. | Enter a group name and group details. |
| c. | Select the type of change that this group applies to. |
| d. | Click Save. |
6.Click Next to go to the next page.
Defining the Standard Change Templates
Use the Application Setup - Standard Change Templates page to activate and deactivate any templates that you need.
|
Template |
Roles Published To |
|
Create Mail Archive for MS Exchange Mail Folder |
Administrator Change Manager Release Manager Service Desk Analyst Service Desk Manager Support Desk Analyst with Call Log Support Desk Manager with Call Log Portfolio Manager Project Manager |
|
Install Approved Software Package |
Administrator Change Manager Release Manager Service Desk Analyst Service Desk Manager Portfolio Manager Project Manager |
|
MS Security Patch Install for Windows Servers |
Administrator Change Manager Release Manager Service Desk Analyst Service Desk Manager Portfolio Manager Project Manager |
| Replace Printer Accessory |
Administrator Change Manager Release Manager Service Desk Analyst Service Desk Manager Portfolio Manager Project Manager |
|
Server Reboot |
Administrator Change Manager Release Manager Service Desk Analyst Service Desk Manager Portfolio Manager Project Manager |
|
Server Relocation |
Administrator Change Manager Release Manager Service Desk Analyst Service Desk Manager Support Desk Analyst with Call Log Support Desk Manager with Call Log Portfolio Manager Project Manager |
|
Standard |
Administrator Change Manager Release Manager Service Desk Analyst Service Desk Manager Portfolio Manager Project Manager |
|
Update Antivirus Files |
Administrator Change Manager Release Manager Service Desk Analyst Service Desk Manager Support Desk Analyst with Call Log Support Desk Manager with Call Log Portfolio Manager Project Manager |
1.Click Standard Change Templates. The application displays the Application Setup - Standard Change Templates page.
2.To enable a template, check the box preceding its name.
3.To disable a template, uncheck the box. (You cannot delete templates, but you can disable them.)
4.To rename a template, do the following;
| a. | Click Rename next to the template. |
| b. | Change the name. |
| c. | Click Save. |
5.To edit a template, do the following:
| a. | Click Edit Templates. The application displays the Actions Manager workspace in a new window. |
| b. | Highlight the template to edit. |
| c. | Edit the template as needed. See Using Quick Actions for more information. |
6.Click Next to go to the next page.
Configuring the Change Dashboard
Use the Application Setup - Dashboard Manager page to select the dashboard parts to display on the Change dashboard.
You can choose from the following dashboards:
•Requested Changes
•Top 5 CIs with Active Changes
•Changes Pending Approval
•Variance Report
•Active Changes by Type
•Major Changes
Follow these steps:
1.Click Manage Dashboard. The application displays the Application Setup - Dashboard Manager page.
2.Check a dashboard part name to display it on the Change dashboard.
3.Click Preview to see a preview of what the dashboard will look like with this dashboard part. Click Escape to close the preview.
4.To rename a dashboard, do the following:
| a. | Click Rename. |
| b. | Enter a new name. |
| c. | Click Save. |
5.Click Next to go to the next page.
Defining the Configuration Items for Change Management
Use the Application Setup - Configuration Items page to select the configuration items to be controlled by change management.
When enabling change control for a configuration item, you must manually add the IsInChangeControl Boolean field to related forms and lists, and add the baseline child panel to related layouts. After you enable change control, add the Run Baseline quick action.
1.Click Configuration Items. The application displays the Application Setup - Configuration Items page with the configuration items listed below.
|
Configuration Item |
Description |
|
AccessPoint |
Subscriber connection to the network. |
|
BatchJob |
Executing a series of non-interactive jobs as one job. |
|
Cluster |
Connection of two or more computers for tasks such as parallel processing, load balancing and fault tolerance. |
|
Computer |
Physical computer with a generic role, rather than a workstation or server. |
|
Contract |
Legal document managed and stored in the application. |
|
Database |
Managed database. |
|
Document |
Generic category for stored documents. |
|
EnterpriseApplication |
Applications designed to work with other applications used within the organization, and to be deployed across a variety of networks. |
| ESX | A VMware server for deploying and serving virtual computers. |
|
FAX |
Facsimile machine. |
|
Firewall |
Hardware-based firewall for your network. |
|
Generator |
Physical device for generating power. |
|
Hub |
Common connection point for devices in a network. |
|
Middleware |
Middleware |
|
MobileDevice |
Mobile hardware such as a cell phone or PDA. |
|
Monitor |
Physical computer monitor. |
|
PeripheralDevice |
Computer device, such as a CD-ROM drive or printer, that is not part of the essential computer. |
|
Phone |
Desktop telephone. |
|
Printer |
Displays and manages all printers and related data within the configuration management database. |
|
ProductivityApp |
Software used to enhance productivity (word processing, spreadsheet, etc.) |
|
Rack |
Physical rack used for mounting computer hardware. |
|
Router |
Device that forwards data packets along networks. |
|
SAN |
High-speed subnetwork of shared physical storage devices. Each storage device contains a disk or disks for storing data. |
|
Scanner |
Physical scanning device for digitizing images. |
|
Server |
Physical network server. |
|
Service |
Method of sharing business logic, data, and processes. |
|
Switch |
Device that filters and forwards packets between LAN segments. |
|
System |
System that collects and stores data. |
| UnknownDevice |
Any device that the application discovers on the network, but is unable to determine what kind of a device it is. For example, there could be a voice over IP phone on the network, and the application saw it watching network traffic. The application may ask it what it is using SNMP, and if there is no answer, the application lists it as an unknown device. |
|
UPS |
Uninterruptible power supply, a power supply that includes a battery to maintain power in the event of a power outage. Typically, a UPS keeps a computer running for several minutes after a power outage, enabling you to save data that is in RAM and shut down the computer gracefully. |
|
Video Conference |
Videoconferncing equipment. |
|
VirtualServer |
Virtual machine instance used as a server. |
|
VirtualWorkstation |
Virtual machine instance used as a workstation. |
|
VOIP |
Voice Over IP |
|
Workstation |
Physical computer workstation. |
2.Check the name of a configuration item to allow it to be controlled by the change management process.
3.Click Next to save your settings and go to the next page. See Configuring the Service Desk.
Was this article useful?
Copyright © 2019, Ivanti. All rights reserved.